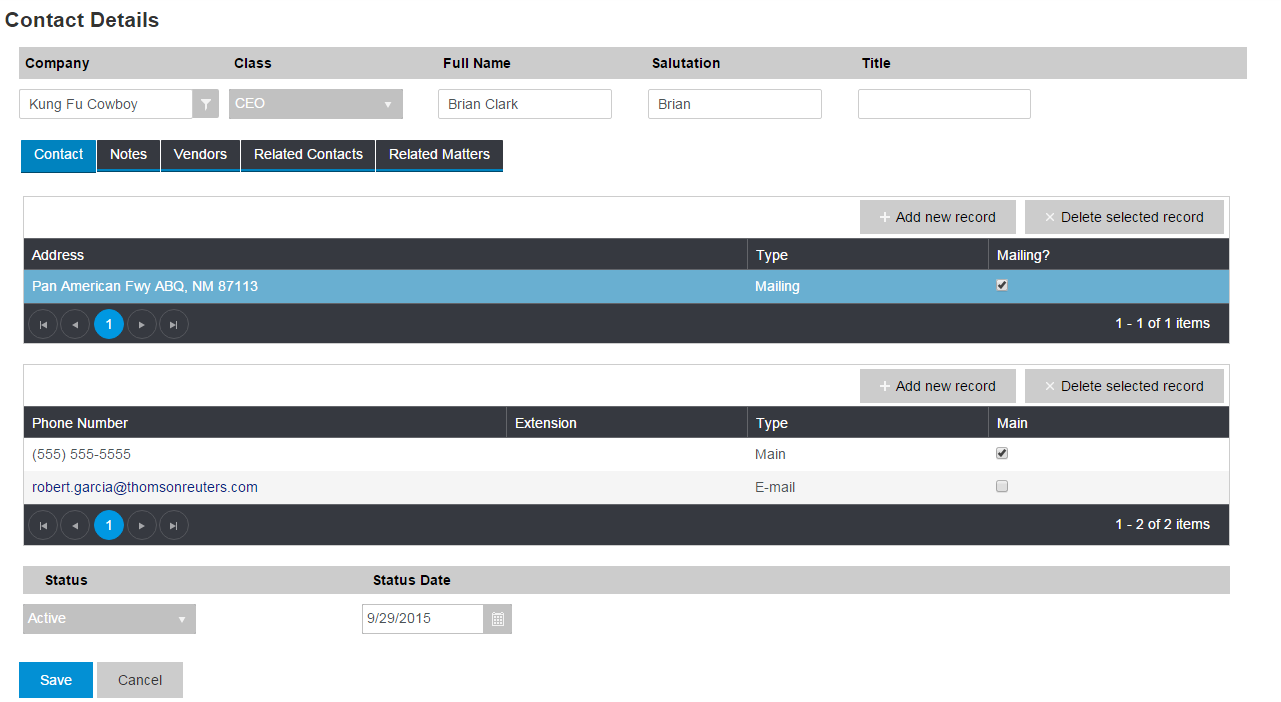
A Contacts record is a collection of tabs that display as much information about the client, opposing party, witness, vendor, etc., as possible. The top of the Contacts record view, the record header, contains the name, company, class, salutation, and title for the contact. The header appears regardless of which tab is selected.
The following is the standard Contact Details page.
The Contact Details Page displays the following fields.
Field |
Description |
||||||||||||||||||||||||
Contact Tab |
|||||||||||||||||||||||||
Address |
Displays the address of the contact. Click the Add New Record button to add an additional address for the contact. |
||||||||||||||||||||||||
Type |
Displays the type of address. The first address defaults to type Mailing, provided that type exists in your database. Click the down arrow to the right of the field to view the possible values. |
||||||||||||||||||||||||
Mailing? |
Select the Mailing? check box only if an address is used for mailing statements, documents, etc. That is also the address that will appear on the matter, if this is a billing or client contact for a matter(s). This check box is checked by default on the first address entered. One row in the grid must be marked as Mailing, and only one address can be selected as the mailing address for each contact. |
||||||||||||||||||||||||
Phone Numbers Grid |
Add the contact's telephone numbers, fax numbers, e-mail addresses, and web sites in the Phone Numbers grid. Enter a Phone Number in the text field provided. Enter an Extension, if applicable. Select a Type (e.g., main, fax, home, office, etc.) from the drop-down list. One row in the grid must be marked as Main. Any row in this grid, even an e-mail address or website, can be marked as the main phone number. Clicking on an e-mail address in the grid launches Microsoft Outlook. The e-mail address displays in the To field of a new e-mail. Click the Add New Record button to add an additional phone number. |
||||||||||||||||||||||||
Status and Status Date |
Track the contact's current status with the firm using Status and Status Date. Status Date is the beginning date of the current status. For example, a contact might first be entered into the system as a possible client. Thus, the Status and Status Date indicate when they became a prospect. When they become a client, change Status to client. |
||||||||||||||||||||||||
Notes Tab |
|||||||||||||||||||||||||
Text Box |
Attach additional information pertaining to the contact by simply entering text into the large text field. |
||||||||||||||||||||||||
Mailing List Grid |
Use this grid to add the contact to a mailing list. Click Add New Record, and then click the down arrow to select the desired mailing list. |
||||||||||||||||||||||||
Personal Contact For Grid |
Use this grid to assign the contact as a personal contact for a professional. Click Add New Record, and then click the funnel next to the Initials or Personal Contact field to select the professional. |
||||||||||||||||||||||||
Vendors Tab |
|||||||||||||||||||||||||
One Invoice per Check |
If this check box is selected, each invoice from the vendor will get its own check rather than having all the payables print on one check. |
||||||||||||||||||||||||
1099 Box |
Displays the 1099 box to be used as default with checks written to specific contacts.
|
||||||||||||||||||||||||
Default Account (Checks) |
This is the account that gets DEBITED any time a check is cut to this vendor-- general ledger expense account that the vendor's checks are typically offset to. If the account is different for a specific check or payable, it is possible to change it when entering the payable. This account is used as the default offset for all checks, including settlement checks. |
||||||||||||||||||||||||
Default Account (Invoices) |
This is the default account used for entering invoices. |
||||||||||||||||||||||||
Default Component |
For a vendor whose checks post against a hard costs advanced account, this component will automatically be used in the associated transaction. |
||||||||||||||||||||||||
Net Days |
Enter payables the moment they are received without affecting the balance of the account. The date on the journal entry will be set forward automatically by the specified number of days and the entry will be placed on hold if that date is in the next accounting period. |
||||||||||||||||||||||||
Federal Tax ID |
If this is a 1099 vendor, their federal tax ID displays here. |
||||||||||||||||||||||||
Default Routing |
The method by which a check will be delivered; for example, mail, courier, electronic deposit, etc. |
||||||||||||||||||||||||
Related Contacts Tab |
|||||||||||||||||||||||||
Related Contacts Grid |
This grid displays the contacts that are related to the current contact. To add a related contact, click Add New Record, and select the related contact by clicking the funnel under Related Contact to search by full name, or by clicking the funnel under Company to search by company name. To delete a related contact, click the related contact to select it, and then click the Delete Selected Record button. |
||||||||||||||||||||||||
Related Matters Tab |
|||||||||||||||||||||||||
Related Matters Grid |
This grid displays the matters that are related to the current contact. To add a related matter, click Add New Record, and select the related matter by clicking the funnel under Related Matter ID or by clicking the funnel under Client Sort. To delete a related matter, click the related matter to select it, and then click the Delete Selected Record button. |
||||||||||||||||||||||||
Custom Tabs |
|||||||||||||||||||||||||
[Custom Tab Name] |
Custom tabs that are created in Desktop ProLaw are displayed in ProLaw Portal and can be edited. Custom tabs cannot be created in ProLaw Portal. The fields on a custom tab display vertically in ProLaw Portal; they are not in the same position as they are in Desktop ProLaw.
Note: When Custom tabs are designed in ProLaw, the fields on the tab are entered in an XML file. The fields are ordered in the XML file in the same order that the designer enters the fields in the user interface. If the designer changes the order, location, or size of the fields in ProLaw, the XML file is updated with the new X,Y coordinates, size, etc. However, the order of the fields in the XML file is not changed. ProLaw Portal displays the fields in the same top-to-bottom order that the fields display in the XML file. Therefore, changing the order of the fields in the ProLaw user interface does not affect the order of the fields in ProLaw Portal. |
||||||||||||||||||||||||
See also: